
Part of me wishes I had never known that the deadline was extended a week, because I would be enjoying my pretty new dining room right now. But no, the deadline was pushed out, and I’m pushing out the panic one more week. It’s not that nothing is getting done – lots is getting done! There has been some divine design intervention, let me tell you. This post has some affiliate links.
As you might remember, choosing some upholstered chairs for the ends of my dining room table has been on my list since this project started. But I’ve had some anxiety in pulling the trigger and buying online, especially when I read reviews that say, “Color isn’t as it appears online.” Yikes. This is one of those purchases that I want to see in person, to be certain that it’s what I want because I’d rather go to the dentist than have to return a large item like this.
So what do I do? I stop by Restoration Hardware Outlet again just to see if they might have some upholstered chairs, even though they had nothing just a week ago. Well, would you believe it…
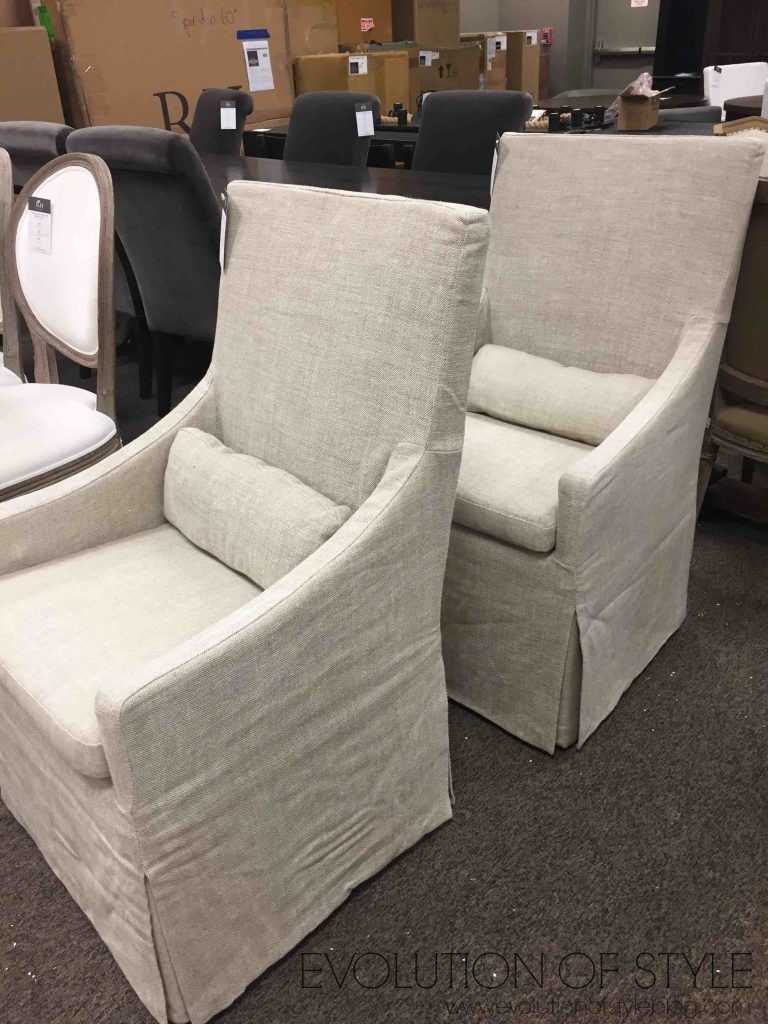
What are the odds?!? And they are exactly what I wanted – sloped arms and everything! They even have casters. And the price – originally marked at $475 each, marked down to $311, with another 30% off. Score! I practically ran out the door with them. Well, I rolled out the door with them.
The chandelier (also from Restoration Hardware Outlet) was installed last week, and despite a glitch with the shade (they originally installed it upside down, ironically making it look like a coffin – not the look I was going for if you’ll remember). But once they got that sorted out, we were good to go.

And the drapes. Oh. my. goodness. They’re so beautiful, and I know my mom is on the verge of a nervous breakdown in finishing them, but they are perfection. My dad has been helping too, telling me about how he used the Pythagorean Theorem to make sure everything was square.
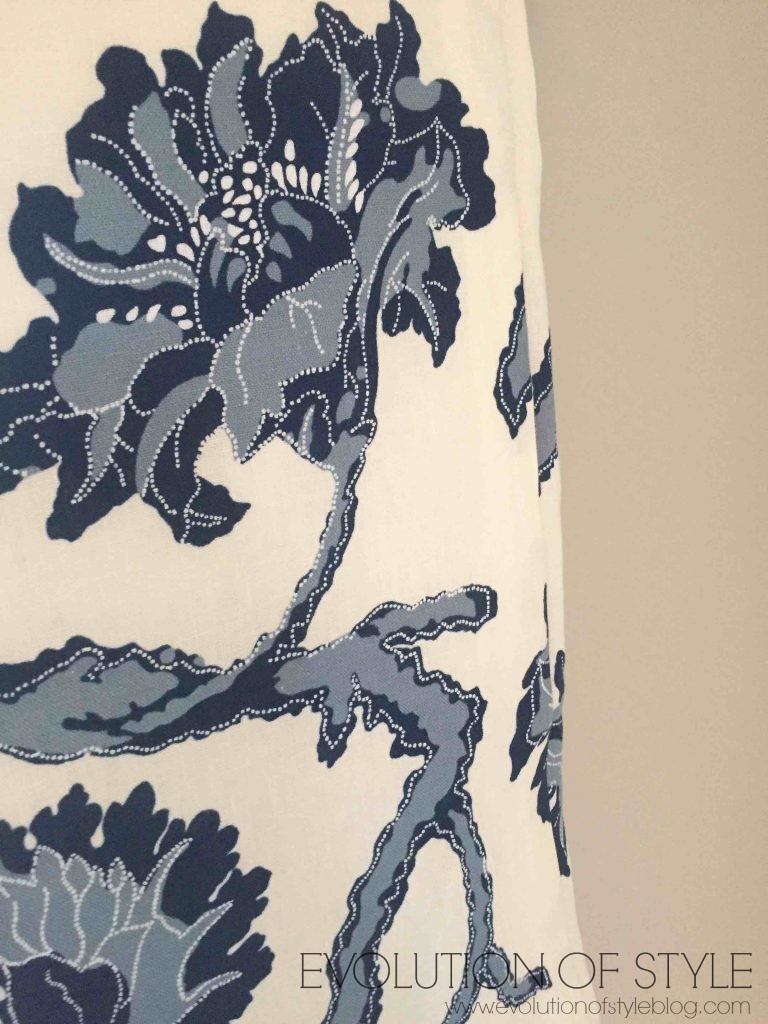
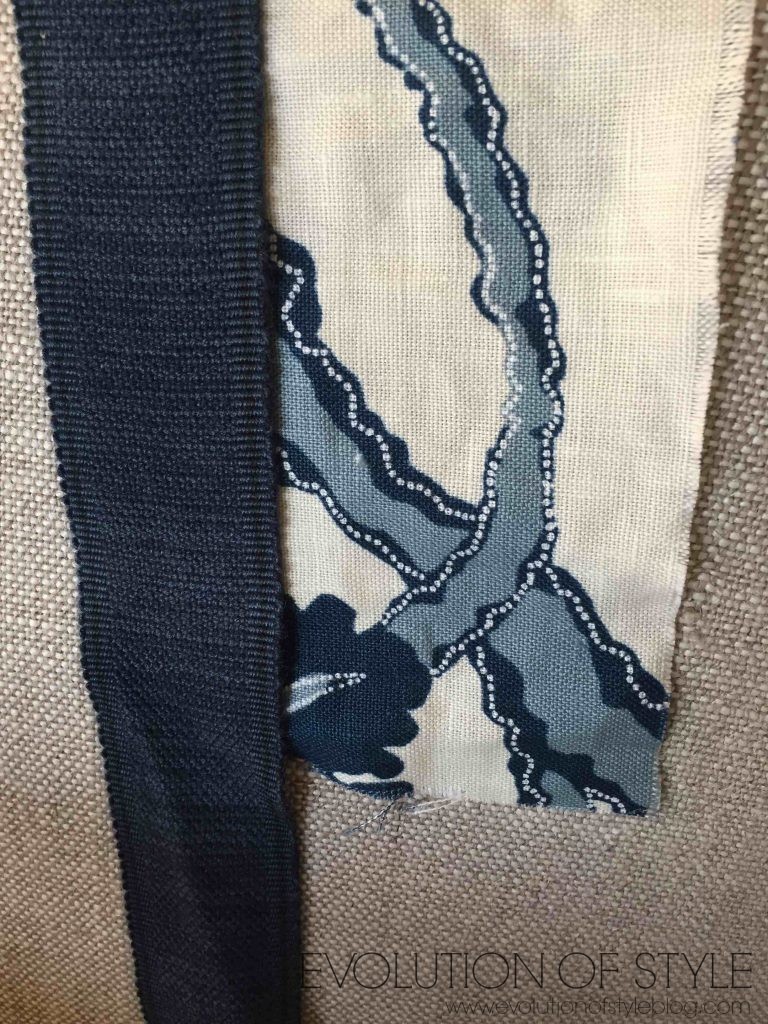
In order to keep my mother from disowning me, I am not doing a band of fabric, but rather a border of trim. The band of fabric would probably send her over the edge, so I figured it should be pretty simple to find trim, right? The lady at the fabric store said I could even use grosgrain ribbon. Sure, no problem. Well, if you look closely at the fabric, it’s not navy, it’s more of an indigo color. And you don’t full appreciate this until you hold something that’s a true navy against it.
So, four stores and six hours later, I go online and discover a perfect indigo trim that was in the same book as my fabric. It was on the spendy side, but it arrived today, and is the perfect shade of indigo blue.
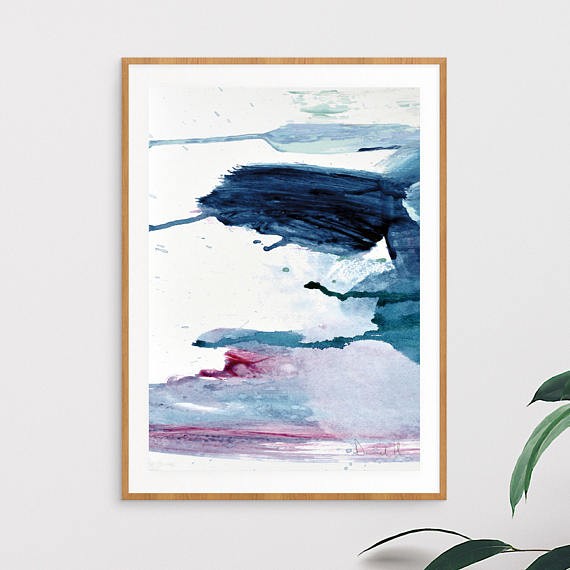
And as for artwork, last week, Cyndi, a smart reader, suggested buying digital art via Etsy and having it printed and framed with a “standard” sized frame that’s easily available. Brilliant! I loved the artwork she suggested too! Something like this abstract artwork would be a neat contrast to the traditional elements that I have going on in here, and it will be a lot easier to pull together!
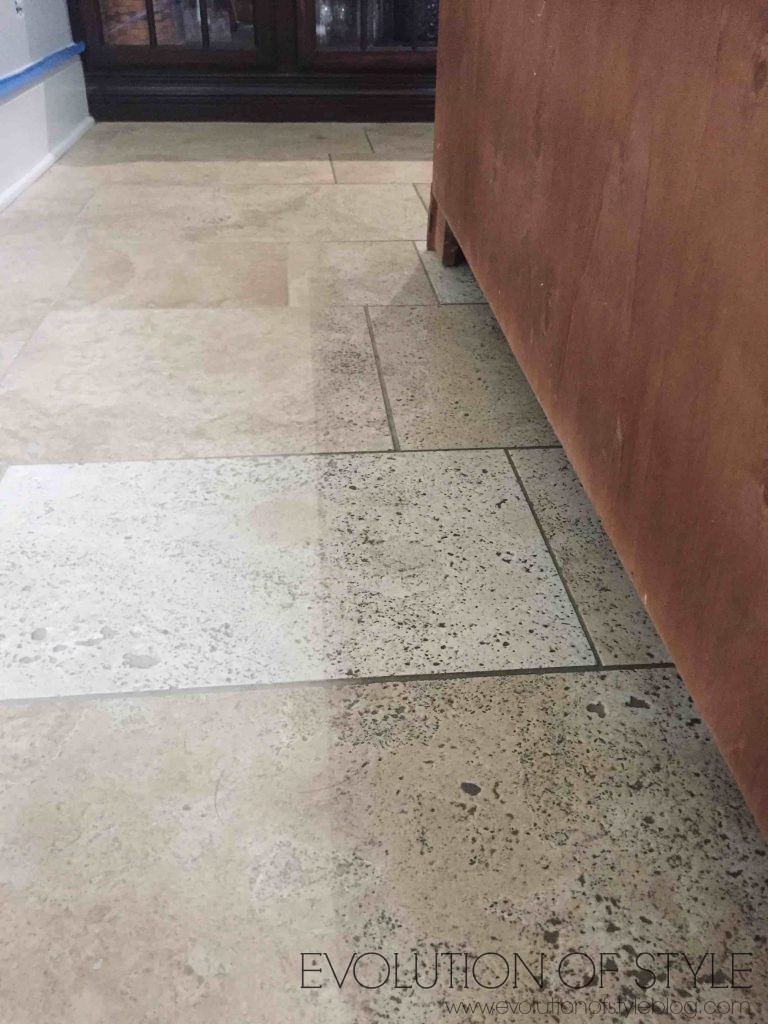
As for the dirty little secret, I’m sharing this with you because I feel like we’re friends, and friends know that things don’t always look that great when you look closely. So, let’s take a close look at my floors when I moved my buffet to paint the walls. I seriously can’t believe I’m sharing this, so please, be kind.
See that line? That’s not a shadow. That’s a line dividing the clean floor vs. the dirty floor. Um, yeah. Gross. These floors are pretty (while clean), but super porous, and dirt just gravitates and settles in. I have called for quotes to clean them professionally, but keep hearing that it’s crazy expensive (and we have a lot of this tile in our house).
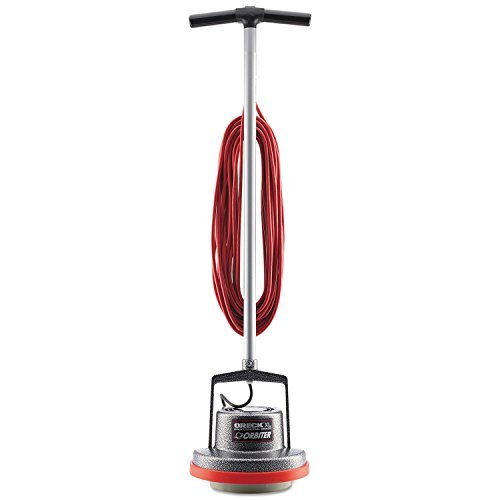
So, I have decided to tackle these floors myself, and after reading rave reviews, bought this Oreck Orbiter Floor Machine. I have scrubbers and cleaners and I know I’m going to have to seal it as well. I will be the guinea pig in testing this to see if it works. The great thing is that it’s good on carpet and hardwood floors too. So, I’ll make sure to give you the play by play when I put it to work. Until then, let’s pretend like we never had this conversation.
I really hope it works, because you know how I feel about returning things.
If you’ve missed anything and are looking to catch up – check out the progress here:
One Room Challenge Week #1: Dining Room Plans
One Room Challenge Week #2: Fabric Ideas
One Room Challenge Week #3: Paint and the Crypt Keeper Chandelier
One Room Challenge Week #4: Rugs + Chairs + DEALS
One Room Challenge Week #5: Bold Artwork
Stay tuned for the big reveal next week! I’m really excited to share the final result.
Jenny
Linking up: Calling it Home Participant Link Up

20 Comments
Calypso in the Country
November 9, 2017 at 7:31 amLove the progress! We had grout problems when we had tile floors in our kitchen and we used to have Stanley Steemer come and clean them every now and then. Keep them in mind if your new purchase doesn’t work! Congrats on the great RH score!
Shelley
Jenny
November 9, 2017 at 9:16 pmThanks Shelley – grout and tile can be so gross, can’t they? I’m excited to put this machine to work!
Becky Mullowney
November 9, 2017 at 9:10 amJenny, have your mom (or you can do this later) use FABRIC glue and glue the ribbon / trim to the edge of
the curtains. MUCH easier than sewing, and it would be easy to add later if you can’t a trim you like right now. Just lay the curtains out on a clean floor, glue the trim in place with the fabric glue, let dry over night. I always used a guest bedroom floor so I could keep our animals away while the glue dried. Just don’t use too much glue or it will saturate the ribbon / trim. I’ve made curtains for several houses and always glue the trim….never ever had a problem with it staying.
Jenny
November 9, 2017 at 9:15 pmThanks for the tip Becky! My mom is checking out some non-sewing options to finish these drapes for good!
Pam
November 9, 2017 at 10:01 amI have porous travertine floors too. I pulled the trigger on an Oreck orbiter two years ago and am soooo glad I did. It’s still lot of work, but nothing else comes close to cleaning as well. What I’ve had trouble with is finding a sealer that doesn’t gray out the floor. Post your results please.
Jenny
November 9, 2017 at 9:14 pmI will definitely share my results Pam! I’m so happy to hear you’ve had success with the Oreck as well. They’re nice floors, but ugh, the porous factor is killing me!
Lauren@SimplyLKJ
November 9, 2017 at 10:15 amWow…great find on the chairs! And I cannot wait to see those drapes when they are finished. The fabric and trim are gorgeous!
And, I really am curious how well the floor machine works.
Jenny
November 9, 2017 at 9:13 pmMy mom has done such an amazing job with them, I can’t wait to hang them this weekend!
Meg
November 9, 2017 at 1:15 pmI love those chairs! Such a score… I wish we had an outlet near us! They are exactly what I need for our dining room. And that fabric and trim is beautiful! As for your dirty secret… we live in Florida and so many houses have tile floor, so yeah that’s a normal sight for me! When we built the house we’re in now, we went with mostly carpet just because of how dirty tile and grout get and it’s such a pain to keep it looking new! Can’t wait to see your reveal!
Jenny
November 9, 2017 at 9:12 pmThanks Meg! Even though our local RH Outlet does have a lot of stuff that is still on the expensive side, I really have lucked out with some awesome deals for this dining room! REALLY hoping the magic tile cleaning machine does the trick, because ripping out the floors isn’t an option at the moment!
Barbara Sewell
November 9, 2017 at 6:40 pmI LOVE that you shared your dirty little secret! Years (and years) ago, I had a sheet vinyl floor with the little divots in it that collected dirty water every time I mopped the floor. I’m sure you were appalled but it’s the floor, not you. 🙂 Hope your cleaning machine does the trick.
Jenny
November 9, 2017 at 9:08 pmI hope it does the trick too! If it does, I’ll be sure to scream it from the rooftops! But ugh, how horrifying!
Nancy
November 10, 2017 at 5:59 amJenny, I know you are crazy busy right now, but could you do a future post on the Etsy printable art . I would really like to know the process: Do you download onto a zip drive and take to a printer like Staples?, paper choice etc. Thanks.
Jenny
November 10, 2017 at 9:39 amAbsolutely Nancy! Great idea! I’ve done some printing of some “engineered prints” through my local print shop, but on those I wasn’t looking for anything super high quality, if that makes sense. Holiday chalkboard prints – that sort of thing. I’m sure this will be a learning experience for me as well, and I’ll be happy to share!
Lisa
November 10, 2017 at 9:37 amJenny those chairs!! I’m dying! I have an RH outlet near me and always keep my eye out for something just like these. They are going to look so gorgeous in your dining room! And the curtains, gah!! Love!!
Jenny
November 10, 2017 at 9:38 amI have never been so lucky in my outlet shopping! It was like the heavens opened up and the angels started singing when I found those chairs! 🙂
Libbie
November 10, 2017 at 10:10 pmThose chairs!!!! I am loving all the elements you’ve selected and can’t wait to see it all pulled together in the reveal.
Jenny
November 14, 2017 at 11:24 pmThanks so much Libbie – it’s really coming together beautifully, and I’m really excited to share the reveal!
Cyndi J
November 11, 2017 at 8:33 amJenny, I’m so happy that my art suggestion helped. One of the biggest problems with buying already manufactured prints is that so many of the prints are a square size. And ready made square frames are difficult to find. With a digital print, even if the print you like comes in a square size (like the one I purchased from that artist I mentioned on Etsy), it can be cropped and then sized to fit a standard size frame. I cropped the square size to fit a rectangular frame. Also, you can have the print right out to the edges for a no mat look, add your own border, or have a mat cut. Regarding mats, I found a small local frame shop that beat Joann’s 50% off price. I had mine printed at Staples (downloaded to a thumb drive). I did not use their engineer print because the paper is too thin for that amount of ink. I think they had three qualities of paper for printing and I choose the middle grade (if I remember correctly). The printing price was about $30. I refuse to have a $20-50 print custom framed since custom framing runs $200-400!
Jen @ Noting Grace
November 12, 2017 at 2:23 pmThis extension messed with me this week, too! It’s crunch time now! I can’t wait to see the big reveal on Thursday – I love the fabric you chose.